Checklist For Buying a Used Motorbike
Buying a used motorbike is an exciting time. However, we are all aware that there are lemons out there, and if you buy one, excitement will quickly be replaced by disappointment, and possibly a bunch of costly repairs. The purpose of this article is to provide a checklist to help you evaluate a used motorbike, and establish if it is a good bike, or a lemon.
When looking at a used bike, go through each of the checklist items below:
Maintenance History
You've probably heard the old real estate agent’s mantra "location location location" which means a property's location plays a critical role in its value. Similarly, the used bike buyer’s mantra is "maintenance maintenance maintenance" which means a motorbike’s maintenance routine plays a critical role in its value, reliability and longevity.
If a motorbike is well maintained, the life expectancy is significantly longer than a motorbike that is poorly maintained. The goal is trying to establish the maintenance history of the bike you are standing in front of and considering buying. Sometimes, this can be tricky.
The easiest way to get insight into a bike's maintenance history is by viewing the bike's receipts and log records for maintenance and repairs. Normally a seller will be forthcoming in providing these but if they aren’t, definitely ask for them. If they have serviced or repaired the bike themselves rather than using a local bike mechanic, then they should have receipts and records for the oil, filters, brake pads etc that they used. Ultimately, a bike with a good history of receipts and log records, is a good sign.
Check How Clean The Bike Is
If the bike is dirty at the time of viewing this really isn't a good indication of the sellers level of care for the bike. If they haven’t got the motivation to clean the bike for a potential buyer then it is quite likely the bike has spent most of its life covered in filth.
Check The Servicing And Repair Techniques
If the person who has serviced or repaired the bike has used the incorrect tools or techniques, it can result in stripped bolt heads, stripped bolt threads and other damage. Have a good look over the bike to see if you notice any signs of damage from the wrong tools or techniques.
If you do find any issues, it could indicate more significant damage. If for example the owner has opened the side cover to change a clutch pack, you may need to consider if there is damage on the inside of the motor too.
Check The Motor Oil Condition
Checking the motor oil is very important. If the motor oil is very dark black in colour, smells burnt, has an abnormally high viscosity or is noticeably deteriorated by the test of rubbing it between your fingers; this could be a sign that the motor oil has deteriorated past the point of providing adequate protection.
If the motor oil is dirty at the time of viewing this really isn't a good indication of the seller’s oil maintenance routines.
Check The Air Filter
Just like the motor oil, the air filter should always be clean. A dirty air filter is an indication of poor maintenance and should be an alarm bell.
Check The Coolant Level
If the bike is water cooled then check to see that the coolant level is correct by removing the radiator cap. If the coolant fluid is low or below the radiator fins, this is not a good sign. Generally speaking a healthy coolant system will mean the radiator will be full of coolant at all times. If it is not, then something isn’t right. It could mean that somewhere in the coolant system there is a leak or it could mean that the bike has been overheated and the coolant has boiled out the overflow without being recovered through the overflow catchment and return system.
Check The Rims
Bent or dented rims aren't the end of the world however they can be a hassle to repair or costly to replace. It can also indicate that the bike has been ridden very hard. If the bike is not on a bike jack or stand, put the side stand down and push against the rear of the bike to raise the front wheel. Spin the front wheel and watch to see how true the front rim runs. Repeat the process with the back wheel. What you are looking for is sever pulsing or large dents in the rim which means the rim will either need to be repaired or replaced.
Check The Wheel Bearings
While the wheels are raised for checking the rims this is the perfect time to check the wheel bearings. Grab the wheel with both hands, each hand should be on opposite sides of the wheel. Wiggle the wheel back and forth to see if there is any play in the wheel bearings.
It is worth noting that wheel bearings on adventure bikes should be treated as consumables so if the wheel bearings have play and need to be replaced, this is not a big issue. Wheel bearings are low-cost, easy to replace and are a regular part of good adventure bike maintenance.
Check The Brake Pads And Rotors
This is a simple test. Most brake callipers will allow you to view how much braking material is left on the brake pads by simply looking at them. A general rule of thumb is that once brake pads reach 2 mm in thickness, they will need to be replaced. Make sure that when you are checking the brake pads for wear that they are wearing evenly. Uneven wear can indicate a seized brake piston or a worn/notched brake pin.
For the brake rotors, run your fingers across the braking area of each rotor and check that firstly there is adequate thickness and secondly that there are no big scores/gouges. Either of these faults will indicate the rotor needs to be replaced. If the rotor is deeply scored and you replace it, you should also replace the brake pads at the same time as the brake pads will mirror the scored rotor wear.
Like wheel bearings, brake pads and rotors are consumable items so even if they need to be replaced this is not a negative point for the bike; it may however influence price negotiation.
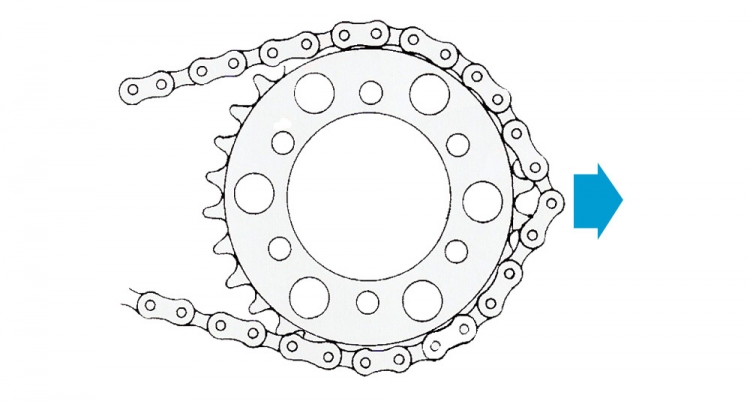
Check The Chain And Sprockets
To check the chain and sprockets there are three simple tests.
Test #1 : visually check the front and rear sprockets for damaged teeth or worn profiles.
Test #2 : visually check the chain for damage, rust, tight links, broken O-rings or damaged rollers.
Test #3 : pullback on the chain at the centre of the rear sprocket. If the chain and sprockets are in good condition, there will be very little play and the chain should fit the rear sprocket quite snugly. If the chain is worn, you will be able to pull the chain out quite some distance. This will indicate that the chain is worn and in need of replacement.
Keep in mind that if one of the sprockets or the chain itself is worn, you will need to replace the chain and sprockets as an entire set. Installing a new chain on worn sprockets or, installing new sprockets with a worn chain will result in rapid premature wear. Golden rule; always change chain and sprockets as a set.
Check The Motor
Starting up and listening to the way the motor runs is the most important part of checking a used bike. The motor is by far one of the most expensive parts of a motorbike to repair. Replacing brake pads, wheel bearings, throttle cables etc all have tiny costs compared to stripping a motor to replace a big end bearing or some other major motor repair. A used motor will often have more noises than a brand-new motor. The goal is to ensure the noises from the motor are normal and relative to the motor's age and that they don’t indicate a more serious issue.
Where possible you should listen to other bikes of the same make and model. If you have a riding buddy that rides the same type of bike you are going to have a look at, definitely have a really good listen to theirs. This will give you a solid comparison when you listen to the motor of the bike for sale.
Check #1 : does the bike start easily when cold?
Check #2 : are there any noises when the motor is cold?
Check #3 : are there any noises when the motor has warmed up?
Check #4 : quickly rev the motor up to high rpm and then let the throttle snap back. Repeat this process half a dozen times. Are there any abnormal noises or vibrations?
Check #5 : slowly rev the motor up to medium rpm and hold it there for a few seconds. Are there any abnormal noises or vibrations?
Check #6 : snap the throttle on fast to check the throttle response. Does the motor respond quickly as expected or does the motor hesitate or even die?
Test Ride The Bike
This is another very important part of the process. Riding the bike will help you test a number of things all at once such as the motor, the brakes, the steering and the overall feel of the bike.
Make sure you go for a decent test ride; not just to the end of their street and back. Throw the bike into some corners, use full throttle and push the motor, apply the brakes aggressively. The goal is to try and expose any issues if they exist.