DRZ400 Side Stand Switch Removal

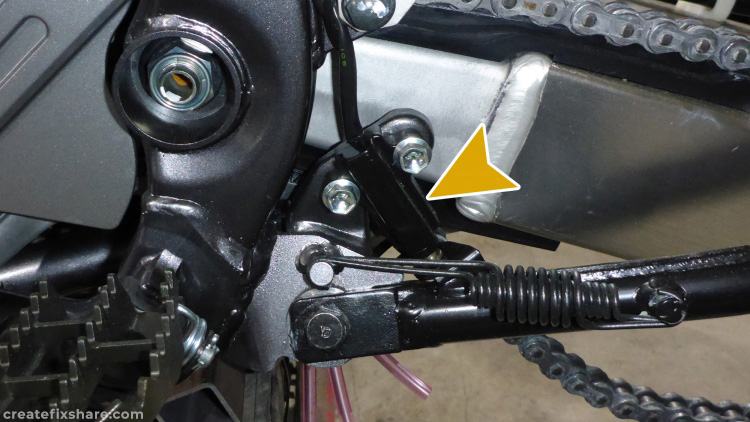
Side stand switches are always on the hit list for removal when building up a reliable adventure bike, DRZ400 included. While the side stand switch on the DRZ400 is a quality unit made by OMRON in Kyoto Japan, it is still susceptible to failure just like any other mechanically driven electronic component. With side stand switches primarily fitted for the novice rider to remember to pull the side stand up before riding off, for seasoned riders who have this ingrained in their riding habits it is essentially redundant. Removing the side stand switch removes a potential cause of failure from the equation and improves the reliability of the bike.

There are two other good reasons to remove the side stand switch. Firstly the side stand spring can weaken over time so when riding over rough terrain, it can trigger the side stand switch resulting in the engine cutting in and out. Secondly some riders can slightly depress the stand with their heel when riding and accidentally trigger the side stand switch, again resulting in the engine cutting in and out.

Photo 1 of DRZ400 Side Stand Switch Removal
The side stand switch mounted to the frame. Undo the two 6mm bolts to remove the switch.
Photo 2 of DRZ400 Side Stand Switch Removal
The side stand switch removed.
Photo 3 of DRZ400 Side Stand Switch Removal
With the seat removed, follow the wires up to find the green plug unit and remove the male plug. Remove the entire side stand switch and plug from the bike.
Photo 4 of DRZ400 Side Stand Switch Removal
Follow the side stand switch female plug wires to where they enter the wiring loom.
Photo 5 of DRZ400 Side Stand Switch Removal
Peel away the wiring loom sheath to expose more length of the two side stand switch wires.
Photo 6 of DRZ400 Side Stand Switch Removal
When the side stand is down, the side stand switch creates an "open" circuit so the bike won't run. When the side stand is up, the side stand switch creates a "closed" circuit and the bike will run. The objective of this mod is to cut the two plug wires, remove the plug and join the two wires to create a permanently closed circuit.
Photo 7 of DRZ400 Side Stand Switch Removal
Use a heat shrink crimp connector to securely connect the two wires.
Photo 8 of DRZ400 Side Stand Switch Removal
Re-wrap the loom wires in the loom sheath and rebind the ends with electrical tape for a nice tidy finish. Tuck the loom back into place.
Author of this article: RMOTO