Setting up a Bike for Adventure Riding
While many motorbikes that target the adventure riding scene are well equipped off the showroom floor, there are normally a few upgrades still required to get a bike ready to set off on an adventure ride. Motorbikes that are not specifically targeted for adventure riding however can have a long list of upgrades to bring them up to an adventure-ready state.
The extent to which you upgrade your bike will all depend on the type of adventure riding you enjoy. For those who prefer tarmac and gravel road adventures this often means there are far less upgrades required. For those that enjoy multi-day camping trips, in remote locations, over remote technical terrain, there is often a long list of upgrades to ensure your bike is up to the task and can carry all the gear and fuel required.
This article will use the Suzuki DRZ400 as an example to go over some the key adventure upgrades that apply to pretty much all bikes being set up for adventure riding. The DRZ400 is by no means a ground-breaking technology bike these days however it is a reliable and capable adventure bike. While the DRZ400 is a good foundation for adventure riding, as a stock bike it is a far cry from being adventure-ready and needs a number of upgrades.
Lightweight Adventure Bike Setup
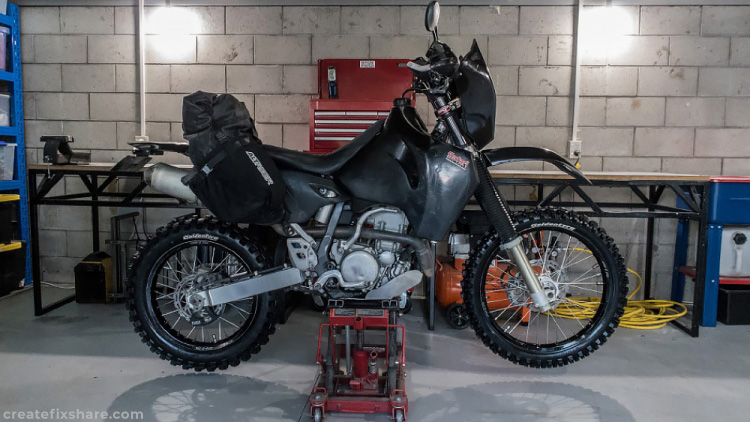
This DRZ400 has been setup for lightweight adventure riding. It has just the core adventure upgrades and uses a compact soft luggage system to keep overall bike weight and bulk down. This setup perfectly suits technical terrain riding while still being fully capable of multi-day riding and camping adventures. When the total bike and gear weight is kept as low as possible, the bike will retain most of its dirt bike ergonomics allowing you to ride more aggressively than a heavily loaded adventure bike.
Fully Equipped Adventure Bike Setup
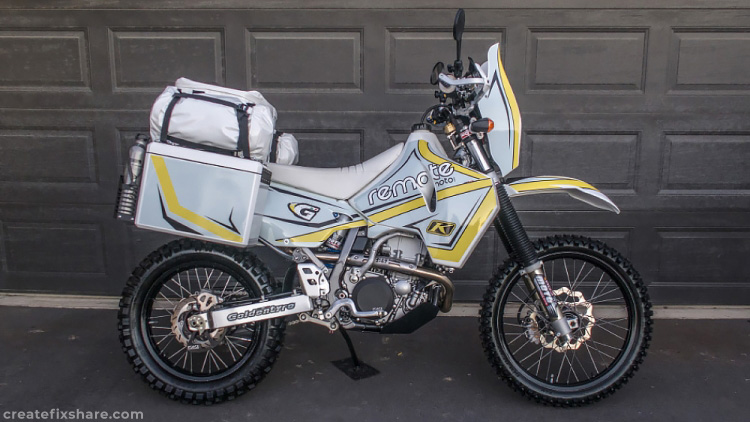
This DRZ400 has been fully equipped for multi-day/multi-week adventure riding. The focus of this setup is to carry all the items that add to the enjoyment of extended adventure riding and camping in remote locations. Luxury items are carried such as a deck chair, camera tripod, comprehensive cooking kit, ample spare clothing, and in this case a full set of fly fishing gear. All these extra items add to the total weight, but really add to a riding experience.
Fully loaded and ready to set off, this bike weighs around 210kg. Naturally this has entirely different ergonomics than the lightweight setup above. This doesn't limit its technical ability, it simply means a very different riding style is needed when tackling challenging grade 5 tracks as the bike is inherently more top heavy and more of a handful to manhandle.
While the two bikes above have a number of differences, they share a lot of the same core upgrades required to be adventure ready. The list below details some of the most essential adventure bike upgrades.
Long-Range Fuel Tank
Most bikes off the showroom floor have small fuel tanks that are unsuitable to cover the distances of remote adventure riding. In Australia for example, many of their desert tracks have over 500 km before fuel stops. For bikes that don’t have a large capacity tank from factory, fitting an aftermarket tank is the most common way to increase fuel range. Common sizes of aftermarket fuel tanks range from 15 to 24 litres but go right up to 32 litres or more. The fuel efficiency of your bike will dictate which tank you will need. Achieving a range of 350 km can be considered a good minimum target when trying to avoid forced detours to refuel.
Engine Protection
A large rock can make short work of smashing open your engine casings and leave you with a bike that has haemorrhaged all of its oil in the middle of nowhere. A bashplate is specifically designed to protect your engine against rocks, logs and other obstacles that can cause damage. It is considered an essential item if you are heading into technical terrain.
Commonly bash plates are made of 4mm aluminium plate but there are other options on the market such as polycarbonate, carbon fibre and Kevlar. Some bash plates cover a wider area than others naturally providing more protection.
For some bike models, protection of the engine side covers, water pump or other vulnerable areas is also needed. In the case of the DRZ400, this bike has exceptionally thin magnesium engine side covers that easily crack when they are struck by an object or even when the bike is simply dropped. Commonly case savers made of 2mm aluminium plate are adhered to the outside of the engine side covers to beef-up the area and provide better protection. Alternatively entire side covers can be replaced with heavy duty CNC machined billet side covers or polycarbonate side covers.
Radiator Protection
For water-cooled bikes, radiator protection is important to adventure bike setup. Stones, rocks, branches, drops or crashes can cause damage to radiators that can result in the coolant draining and leaving you stranded.
A wide range of radiator guards are available from a number of different companies. Some basic radiator guards will provide just frontal protection while other more comprehensive guards will protect against side impact also.
Installation is relatively straightforward for most radiator guards however in some cases compatibility issues can be encountered with aftermarket tanks. Researching what other riders of the same model of bike you ride are using can be a good way to get compatible products the first time around.
Handguards
The benefits of having handguards is twofold. Firstly they provide great protection of your hands when riding past trees and other obstacles you encounter along the track. Secondly they protect your levers and perches against breaking when the bike is dropped.
Most riders will agree the handguards with a full backbone (two mounting points) offer the best protection, for example, Barkbusters.
Aftermarket Seat
This may not apply to all bikes, especially many of the late model bikes targeting the adventure market, but many bikes have very uncomfortable seats and can become painful after just a few hours of riding. There are a number of companies that specifically produce wider and more comfortable seats for adventure riding. One of the most common is Seat Concepts. Investing in a comfortable seat will be money well spent.
Adventure Screen
An adventure screen makes a huge difference when riding long days at high speed. The screen deflects the wind that would normally hit you in the helmet and chest. This wind can cause fatigue and with some riders it can even cause a sore back.
There are a number of screen options from high end rally fairings in the vicinity of $5,000 through to simple homemade options. If you ride a bike with a screen and then ride a bike without one, you’ll soon discover why most adventure bikes have them.
Adventure Luggage
There are two main categories of adventure bike luggage; hard luggage and soft luggage. What is considered to be the best is often a heavily debated topic as there are pros and cons with both.
Commonly, technical off-road oriented riders normally prefer soft luggage. Soft luggage lends itself better to being narrower for riding tight trails, it can handle drops and crashes better than hard luggage as there are no pannier frames to bend. Because there are no pannier frames it is generally lighter than hard luggage and it is often easy to dismount for day rides without luggage.
Hard luggage is normally preferred by adventure riders who embark on longer trips, especially round the world travellers. Hard luggage can normally handle packing larger amounts of gear better than soft luggage, it is often easier to pack and unpack, hard panniers can normally have bottle holders mounted to the back end to store bottles of fuel or oil etc and because panniers can be locked there is an extra level of security.
With regard to the large number of upgrades possible, this is a fairly brief overview of setting up a bike for adventure riding. Because each bike and each rider have such different demands, it is almost impossible to have one article cater to every situation. This article should however give a reasonable indication of the most important areas to address first.